Nexus Standard MPv3 is the next incarnation of the metal detector of the already famous manufacturer. Georgi is a true genius, no doubt about it.
The new detector is not for everyone and not because of its price. It’s all about service and understanding and taking the time. It’s a very difficult device. This is IB (Induction Balance) technology.
The IB metal detector is capable of discriminating between different types of metal objects, such as bottle caps and coins, by distinguishing the amplitude of the corresponding reception signals. In addition, the detector is equipped with a tuning adjustment, which is used to eliminate the influence of ground disturbances with a high content of iron and mineralization.

So in a nutshell and strongly simplified. What does it give? Ability to work in an environment with a lot of iron and mineralization of the substrate!
Unfortunately, this requires a lot of knowledge and awareness from the operator to fully understand the machine. Time and experience plus humility and focus. There is no other way. One mistake in the settings and the whole intricately arranged house of cards collapses.
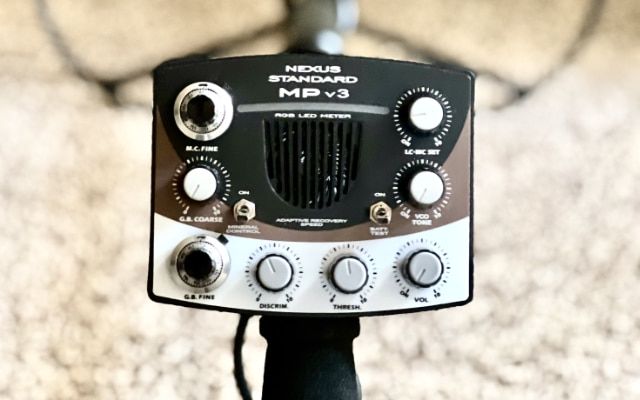
Nexus Standard MPv3 is a typical knob, where the role of identification is taken over by a multi-color LED display. In addition to additional audio, we have a VCO-type selection knob, discrimination, coarse and fine ground calibration, and mineralization switch … there is a bit of it and it’s not easy to get the hang of it. I am full of optimism and the producer gave me full support. Remember to subscribe. It’s time to face this beast. We’ll see how I do. Courage is added by the fact that the set includes a double probe 2x 10 inches, the so-called low-frequency butterfly, which is supposed to translate into depths unattainable for other devices known to me. We’ll see.
Below is a description of the functions and calibration showing how complicated this device is.
Ground calibration. GB in the MP V3 is divided into two knobs – GB Fine and GB Coarse. The fine adjustment is 10 turns for fine-tuning, and the coarse adjustment is one turn for coarse tuning.
To adjust the ground balance, turn both GB knobs to position 10 clockwise. While moving the probe up and down, rotate the Coarse GB counterclockwise until the detector generates a soft signal as the probe descends.
Then tune with GB Fine by turning it counterclockwise. Continue fine-tuning GB in the final phase only with the help of GB Fine.
You can also do GB in reverse order. Turn both knobs to 0, fully counterclockwise. Then adjust GB Coarse until you get a soft signal as the probe goes up, then adjust GB Fine. The MP V3 Discrimination Control needs to be set somewhere around 3-4 on the scale (similar to the MkII) to avoid iron digging. It is best to select the setting on-site after checking several signals.
Unlike the MkII, the MP V3’s discrimination is very soft and forgiving, meaning there is no danger of clipping too much, everything is done in very small steps.
The LC-MC SET knob is used to turn the RGB LED meter on/off and to adjust the cutoff point between the low (LC) and mid (MC) leads. If this control is set to the left (0), only the lowest conductors will be colored green – hand-minted gold coins, Roman gold coins, any small gold coin or artifact, and very small pieces of foil.
All other non-ferrous objects will be marked with either orange (medium MC conductors) or white/blue (high conductors). If you turn the LC-MC SET to the right, some
hand-minted silver coins will be marked low guides as well as most lugs.

Mineral Control can only be used on highly mineralized soil containing magnetite. MC Fine stands for precise regulation of mineralization. The sensitivity of the detector will be slightly reduced, but this will allow you to reach the audible threshold of objects near strong sources of interference caused by mineralization.
The leading signal the threshold in the MP V3 should be set to the minimum audible level at all times like a constant, stable hum so that the deepest small objects can be detected and all others give a really good sure response.
This setup will ensure that the V3 performs far better than any other detector in existence, even the MP V2 (which is a beast in its own right).
The VCO setting is only intended to be used to identify uncertain, deep objects in the cluttered ground. The VCO should be set so that the first green LED just lights up. This will adjust the VCO tones to an audible level between lows and highs.
VCO is the best way to identify very uncertain (weak signals) targets at maximum depth. When searching in the cluttered ground, the guide signal needs to be quiet so that constant use of the VCO audio is not a nuisance.
If you get your hands on one of the 11.5-inch CC probes, you’ll find that the V3 in VCO mode is unbeatable in iron-strewn areas. No digital detectors can come within a mile of what this V3 detector can do with the right probe, according to the manufacturer. We’ll see!
The general advice is to keep the search coil approximately 10 cm off the ground at all locations and maintain a stable guiding signal. Once the target is located, if uncertain, lower the search coil closer to the ground. If the LED meter shows nothing, use the audio VCO to check the target.
Iron will not be indicated on the RGB LED meter unless the discrimination control is set to a value close to 0. In this case, iron will be indicated green as all other low conductors.
The battery test will show levels from 10.5V to 11.5V. So, when the battery test shows less than a full green LED bar, it means the batteries are nearing full discharge.