Posted on Leave a comment

Coinpad OTB treasure box

The so-called coin box created a coin. It’s cheap and simple, a replacement for your pocket, nothing special.

Fortunately, a person has gained experience and improved his qualifications and skills over the years. We are getting better and better, we are improving, setting higher standards for ourselves. The crossbar is suspended high. Trivial solutions cannot take place when you appear, for a professional or so you think.

Idea

I needed a better solution. Years pass, a person becomes more comfortable, but eyesight and motor coordination are no longer the same. Coins are becoming more and more interesting and it’s a shame to wear them with just anything and in any way. This is how I came up with the idea of ​​creating a convenient box. Before this happened, I used ready-made solutions. Cheap solutions. The result was that I lost all the content a few times and unfortunately it wasn’t just any stuff.

Fixing

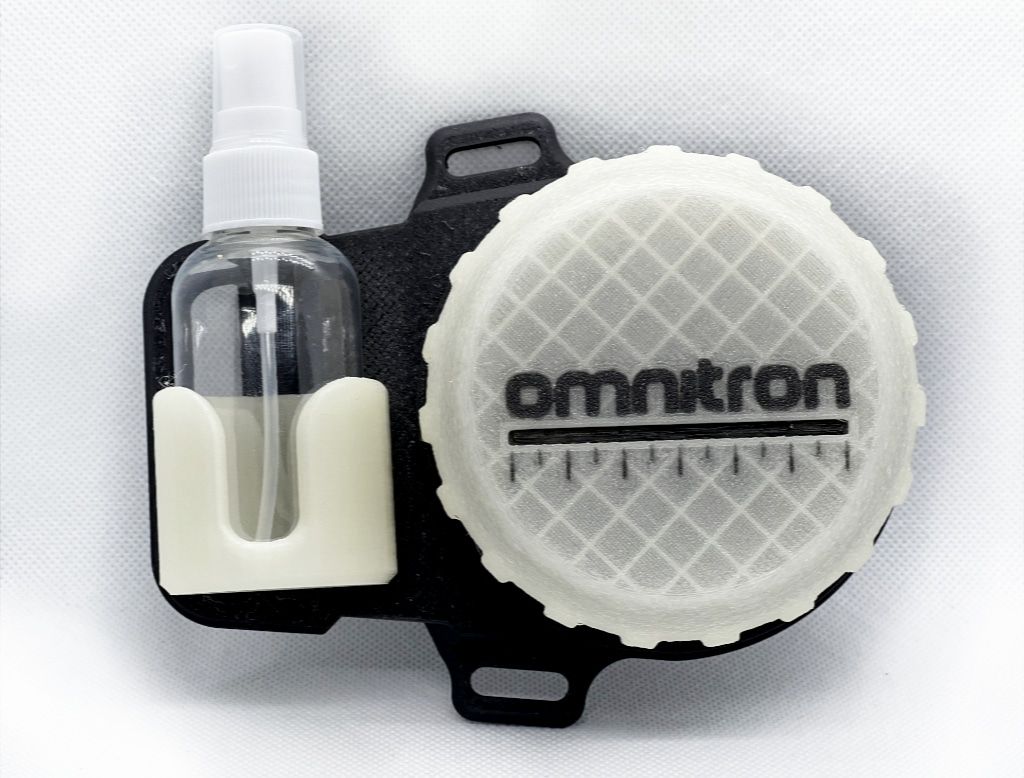
The mounting of my coin box needed to be improved and secured against loss. The magnetic connection itself is a good solution, but as it turned out when testing the first prototypes, I’m not necessarily 100% sure. A sleeve with a slight press fit had to be added. It worked perfectly.

The next step was to install a popular atomizer to clean the surfaces of delicate coins non-invasively. Despite many attempts, I chose a ready-made solution and designed only an atomizer. There were three reasons: low weight, price, and availability in the event of loss or damage. There was no point in creating your solution here.

To mount the brush, here I chose an ecological variant with very soft bristles. There is nothing worse than scratching something under the influence of emotions. The mounting base itself had to be as light as possible, have a belt or pocket clasp, and eyes for additional security or fastening. The set can also be attached to Molle systems from military equipment, backpacks, bags, containers, pouches, etc. Everything is carefully thought out to make the most of the space. Vertical orientation or changing direction also horizontally for left- and right-handed people takes just a few moments. The rear hitch can also be freely rotated and locked with a screw.

Lid

For practical purposes, the lid has a slot with a rough ruler for more detailed viewing of the coin, preliminary measurement, or positioning for a photo.

Under the box, there is a snap-locked magnifying glass with 7x magnification. The magnifying glass, atomizer mount, and box can be available in a fluorescent version for easier orientation in the dark and case of loss. Soft foam with cuts inside is just a formality.

The magnetic mounting allows you to attach the tray to a smooth metal surface, which is sometimes useful when you want to take the box itself.
Write below this article what you think about this solution.

Zapraszamy na nasz kanał na YouTube
Zapraszamy na naszgo BLOGA

Posted on Leave a comment

Ferrous Limits Manticore

Why is discrimination the enemy of the Seeker? I will try to explain it using the top model of the Minelab Manticore detector. Why choose the most expensive equipment possible that most of us cannot afford? There are a few reasons. First of all, this detector has great imaging and you can easily understand everything by looking at the screen. Moreover, masked targets are very easy to spot if something is lying close to the iron.

Apart from discrimination, we can set the so-called iron limits and Ferrous limits. What does it do? The iron scale is wide in this detector, which cannot be said about other devices. What does it do? It is easy to distinguish and separate large and fine iron from each other.

What’s the point of all this? For a simple reason, big irons are often very interesting. A horseshoe, a sword, a cannonball, a bayonet can be the find of the day, and a well-identified bottle cap can save you time.

Ok, let’s start with the basics.

The upper gray bar is the set range of iron – the fine one. In this case, we have an iron nail. The bottom bar is for larger items. The axis in the middle is the conductivity axis from left to right from ID values 1 to 99.

For example, a thin silver coin will be in the middle on the left, but it may also fall… depending on the conditions there…

To be sure, we rotate each target 90 degrees and check how the drawing of the object has changed… this is a really big hint!

Here is the same nail after turning 90 degrees. Why is this happening? Often, iron, especially when rusty and having various complex shapes, distorts its color. In the case of forged nails, it may be their heads or the bend itself. The round and hollow shapes of the target are a story for another article.

The image above shows EMI interference. Just detune the detector or lower the sensitivity.

Here the nail or steel screw can be seen to be on the verge of the upper limit range. What do we do to check? We focus on the goal. Then the object will disappear or completely fall into the upper zone of the range.

A silver-struck coin with a range at the bottom of the ID scale. Low conductor, petty and miserable medieval silver. Please note this type of target may fall into the low end of the iron limit under certain conditions.

Przykład monety maskowanej przez mocno zmineralizowany grunt.

Here’s a coin next to a nail. You can see the signal of an iron object trying to cover the coin’s signature.

Finally, how not to set limits. A textbook example of how not to do it is below. This is an error that closes the device’s potential and does not allow separately masked objects. The detector becomes blind if the coin is next to the iron and there is no chance of separating and identifying it. This setting improves work comfort and silences the device… but only apparently. Moving too close to the axis seems like an ideal solution, but it is not! We have the Silencer option, which also needs to be used carefully.

So how do you set both limits? Under the conditions prevailing in a given place and the lowest – in the sense of the smallest value away from the conductivity axis. If the manufacturer sets the upper limit to 9, try starting with a value of 7 or lower. In my case, the limit is 4 even in difficult conditions. This arrangement places a greater workload on the operator, but also drastically improves the device’s performance.

There is no silver bullet here. You have to exercise until it hurts. Finally, there is the All Metal mode and the complete opening of iron and discrimination limits to check the given object.

Zapraszamy na nasz kanał na YouTube
Zapraszamy na naszgo BLOGA